Because this is what it’s all about.
http://www.flickr.com/photos/mswest/8213515026/
I could also title this post “guerrilla printmaking,” because I’m making stuff up as I go along, and it’s quite fun in a challenging sort of way.
Shortly after arriving here in Carrion de Los Condes, I took a few hours to carve my floating kento. In moku hanga, a form of Japanese printmaking, you carve notches into your wood block and use them to align your paper as you print different layers of color. These notches are known as kento. With a floating kento, the notches are on a separate block of wood, which saves time and effort (though most adherents to this style of printmaking, at least the ones I know, enjoy the precision of carving the kento on each block).
Not being one to follow tradition, and having brought linoleum blocks not wood blocks, and a variety of sizes of block at that, and liking wide margins on my paper, Western-style, and having cut my paper back home in the US so the size is uniform, I thought for a bit about how to integrate my own preferences and situation with the genius of simple yet accurate alignment that a kento allows.
My solution was to carve notches not where the paper sits, but where the blocks would sit. That way the paper could sit exactly where the frame’s corners meet, and I could place each different size block where it would best center on the paper.
http://www.flickr.com/photos/mswest/8212448617/
I am an impatient printmaker. I could have Googled a floating kento, and maybe other people do it this way, too, or maybe I would find that what I’m doing is anathema. But I like puzzling out my own solutions, for better or worse – and the good news is, this has worked out for the better.
Last week, I tried another experiment. I wanted to print Nuestra Señora de Belen in two colors, but since my time here is limited, I didn’t want to carve two blocks, or do a reduction print. I’ve been playing with monoprints, where you paint with ink on a smooth plate and then transfer the ink onto a piece of paper. Why not print what is essentially a monoprint background for this image?
http://www.flickr.com/photos/mswest/8213509830/
The challenge here was that I wanted the church and its hill to remain white. I solved this problem by taking my original tracing and cutting out the church, and keeping the cutout. I also cut the tracing to the exact size of the block.
http://www.flickr.com/photos/mswest/8212450993/
I put the tracing down on the block, put the cut-out church back in its outline, removed the larger tracing, and voila! The church was correctly aligned, and I could paint around it. (Keep in mind that everything in printmaking is reversed, sometimes several times, so right becomes left and left, right; aligning different colors is no simple task.)
http://www.flickr.com/photos/mswest/8213509858/
(Does anyone know what this tool is? It’s brass, and heavy, and is perfect for rubbing a print. If you know, please tell me!)
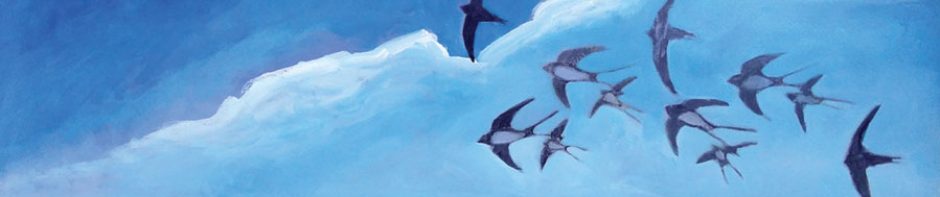
I also wiped off ink at the bottom, to let highlights appear in the water, and on some of the blue layers also wiped a bit off the windy sky.
http://www.flickr.com/photos/mswest/8213512702/
Today, I printed the black layer.
http://www.flickr.com/photos/mswest/8212429153/
I am quite pleased to say the kento worked perfectly. Everything lined up, the blue looks great behind the black, I didn’t smudge or get fingerprints on anything, and now 10 prints are drying in the kitchen. Hooray! Happy dance! It really is all about the hokey pokey today.
http://www.flickr.com/photos/mswest/8212428207/
Next up: finish carving my whiplash sky block, and get a set of prints of that. If everything works out well, there will be just enough time for it to dry before I have to pack everything up and bring it home. The timing will be tight, but I’m putting me left foot in, my left foot out…
So cool! What a fascinating process and such beautiful work. Thanks for showing us both!
Maybe it WAS made as a burnishing tool?